To avoid having to set up new products which are exactly the same but for example of a different size, colour or design, you can create variations with one product upload. This is very useful for the exact same print but different sizes, the same product but different cours or designs. You can judge.
Follow Guide 3 on how to upload a product.

Ensure you are logged into your seller account and click on Vendor Dashboard at the top of the page, then click Products which will take you to the products section of your dashboard.
To add a new product click on the Add New Product button on the top right-hand side of the page.

You will then be shown the new product form. Each product must have a Name, Image, Price, Category, Tags and a Short Description.
Product Name Your title needs to be succinct saying what the item is and who it is by. You can also include additional keywords such as the item’s colour. For example Union Jack Bangles by Charron Pugsley-Hill. If your item has a title, then inverted commas are good. ‘Morning Sunlight’
Price The price you sell your work for is up to you, however, we would advise that you do not undersell yourself, nor set your prices too high. Research what other artists are selling similar products for and do not sell for a lower or higher price than other outlets. It contravenes the Terms and Conditions.
Special Price If you would like to schedule a discounted price for your items you can enter it into this field. This isn’t something we would recommend doing straight away. Keep it for special events or promotions.
Categories It’s important to put your products into the relevant categories as this is one main way they can be found by shoppers. Fit your products into appropriate Categories only. If a category that you feel should be available for you and other sellers is missing, please email us to let us know. Most ideas you require will be covered in Tags, Attributes and Values
Tags Similar to categories, you will need to put your products within tags. These are another way for shoppers to find your work. Start typing a keyword you would like to tag your work under, then select it if it appears. If it doesn’t appear carry on typing and your tag will be generated automatically for everyone’s use.
IMPORTANT. To place your products in the top menu main Categories where all items are displayed when clicked on namely: Christmas; Gifts; Cards and Stationery; Jewellery; Accessories (this is for wearables except jewellery);Homeware; Art and Craft, you MUST include these words as Tags. For example if you are selling a scarf, type in as a Tag Accessories. If you are selling jewellery, type in the Tag Jewellery. These main global Categories are Tag generated. We ask you to consider carefully what you put here. It has to be relevant. Otherwise shoppers will definitely leave the site
Image On the top left-hand side of the new product form you will see an ‘Update a product cover image’ box. This is where you update the primary image for your product; all thumbnails are generated from this image. Clicking this box will allow you to either upload a new image or select an image you have already uploaded.
The smaller boxes with a + in the middle is where you upload additional images for the product. These will only be shown when the customer is viewing the detailed product page.
Short Description Enter a short description about your product in this box. You can provide a more detailed description later.
Once everything is completed you can click the Create Product button at the bottom of the form. This will create the product, saving your changes, and take you to the primary product form where you must enter more information if you want to make your product visible.
Create the Variations on your Product.
Your product will appear in your Products list. Click back into it.
Change Simple Product to Variable Product on the drop down menu near the top

Finish filling out the details for the product by referring to Guide 3.
Now create the Variations on the product by scrolling down to Attributes and Variations.
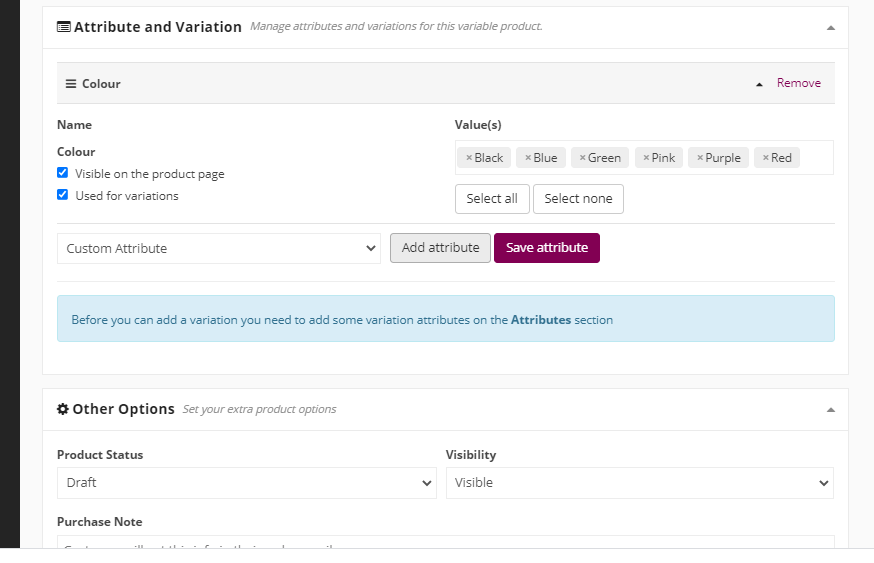
The Attribute you require may be already set up. Use the drop down attributes menu and click on the relevant one eg. Colour
Add the Values eg red blue yellow or create your own colours
Save the Attribute
Make sure you tick the boxes Visible on product page and Used for variations
Then click on Create Variations for all Attributes. Click Go or OK when asked. The Variations you added will appear.
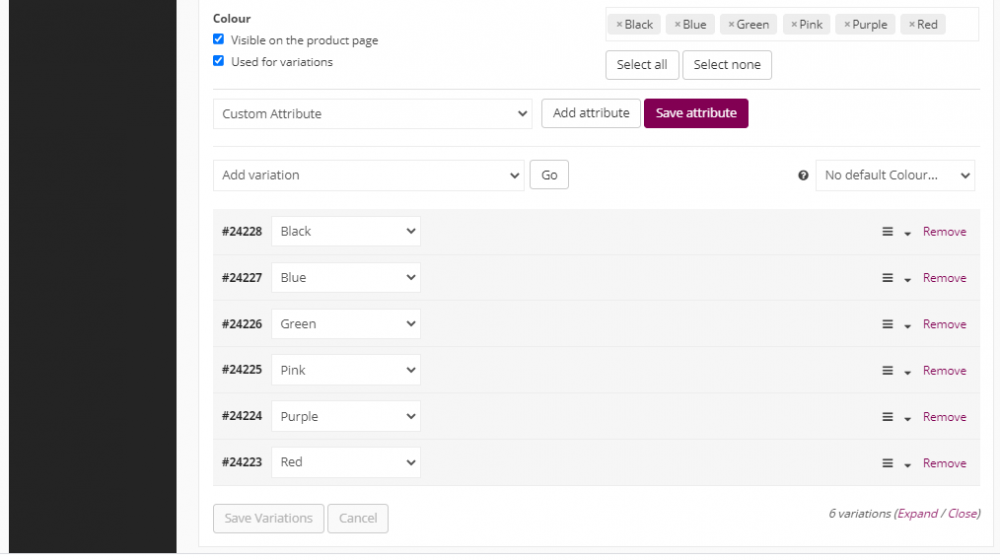
Click on each one and fill out the information for each Variation eg. Image, Price, Stock level etc.

Click on Save Variations and Save Product
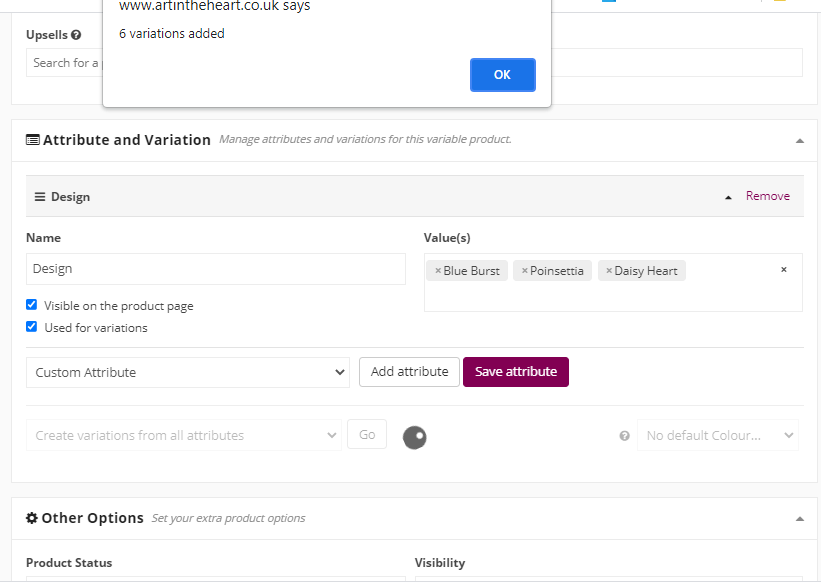
If you want to create your own Attribute, then under the Section Attribute and Variation, click on Custom Attribute. Name your Attribute eg. Design and create your Values eg. Poinsettia, Blue Burst, Daisy Heart. Save the Attribute.
Make sure you tick the boxes Visible on product page and Used for variations
Then Click on Add Valuations from all Attributes. Click Go and OK when asked


Click on each Variation and fill in the details eg. Image, price, stock level, description.
Save Valuations. Save Product
This Product will now have a drop down menus for customers on the site.

You must be logged in to post a comment.