If your Store is not yet up and running, please refer to the Setting up your Store guide. Once your store is up and running, the important thing is to have a well written title, descriptions and images for each product. It is crucial here to assign your products to Categories, Tags, Attributes and Values otherwise your products will not be visible
Preparing your images
Before you upload your products, you need to prepare your images. Imagery is a crucial part of any online store. Imagery can make or break a sale.
We recommend the following:
- Images need to be 1000 pixels on the longest side
- Prepare more than one image per product
- Use good, clear images of the product itself, then the box/tag if appropriate, the picture in the frame, or the edge of the picture if a canvas. Think about how you look at something in the flesh.
- No naff surfaces, backgrounds or dubious attempts at lifestyle shots
- Don’t use art on wall placing apps if you can’t get styles right or can’t get the paintings in the right place, the ceiling isn’t good of course
- Plain white backgrounds are best
- Descriptive file names for your images are better for search engines. IMG9086 is not a good file name. For example: ‘jacki_cairns_british_summertime_print’
You’re now ready to start adding products.
Basic product information
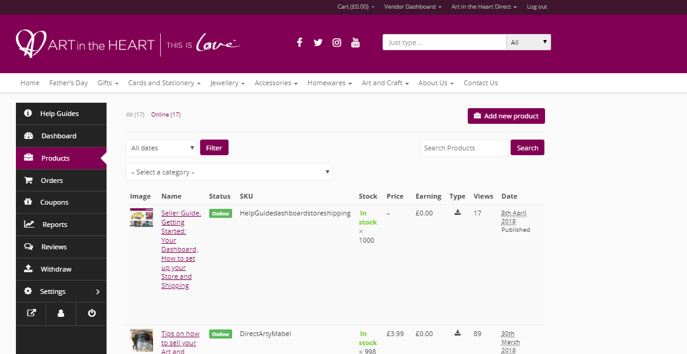
Ensure you are logged into your seller account and click on Vendor Dashboard at the top of the page, then click Products which will take you to the products section of your dashboard.
To add a new product click on the Add New Product button on the top right-hand side of the page.
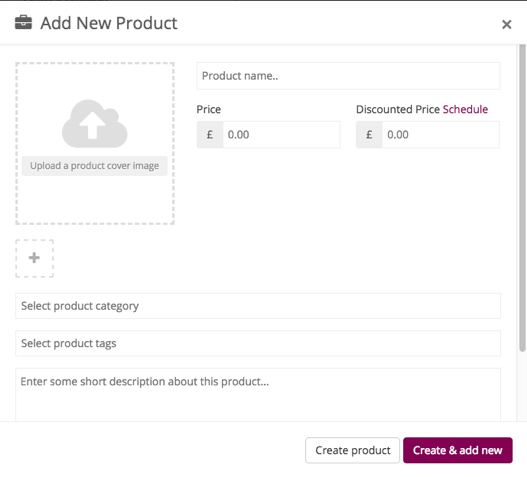
You will then be shown the new product form. Each product must have a Name, Image, Price, Category, Tags and a Short Description.
Product Name Your title needs to be succinct saying what the item is and very importantly who it is by. If you don’t say that then nobody will know as they browse through menus usually and not direct through your store. You can also include additional keywords such as the item’s colour. For example Union Jack Bangles by Charron Pugsley-Hill. If your item has a title, then inverted commas are necessary. ‘Morning Sunlight’
Price The price you sell your work for is up to you, however, we would advise that you do not undersell yourself, nor set your prices too high. Research what other artists are selling similar products for and do not sell for a lower or higher price than other outlets. It contravenes the Terms and Conditions.
Special Price If you would like to schedule a discounted price for your items you can enter it into this field. This isn’t something we would recommend doing straight away, keep it for special events or promotions.
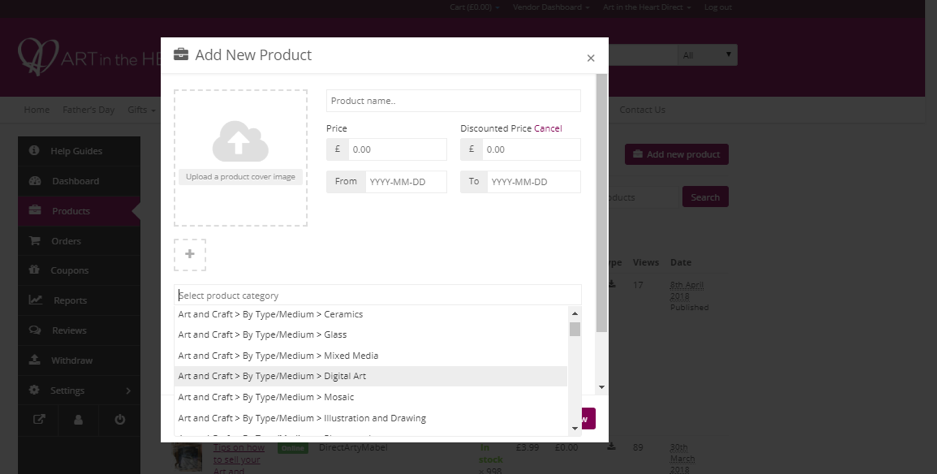
Categories It’s important to put your products into the relevant categories as this is one main way they can be found by shoppers. Fit your products into appropriate Categories only. If a category that you feel should be available for you and other sellers, is missing, please email us to let us know. Most ideas your require will be covered in Tags Attributes and Values
Tags Similar to categories, you will need to put your products within tags. These are another way for shoppers to find your work. Start typing a keyword you would like to tag your work under, then select it if it appears. If it doesn’t appear carry on typing and your tag will be generated automatically for everyone’s use.
IMPORTANT. To place your products in the top menu main Categories where all items are displayed when clicked on namely: Christmas; Gifts; Cards and Stationery; Jewellery; Accessories (this is for wearables except jewellery);Homeware; Art and Craft, you MUST include these words as Tags. For example if you are selling a scarf, type in as a Tag Accessories. If you are selling jewellery, type in the Tag Jewellery. These main global Categories are Tag generated. We ask you to consider carefully what you put here. It has to be relevant. Otherwise the shoppers will definitely leave the site
Image On the top left-hand side of the new product form you will see an ‘Update a product cover image’ box. This is where you update the primary image for your product; all thumbnails are generated from this image. Clicking this box will allow you to either upload a new image or select an image you have already uploaded.
The smaller boxes with a + in the middle is where you upload additional images for the product. These will only be shown when the customer is viewing the detailed product page.
Short Description Enter a short description about your product in this box. You can provide a more detailed description later.
Once everything is completed you can click the Create Product button at the bottom of the form. This will create the product, saving your changes, and take you to the primary product form where you must enter more information if you want to make your product visible.
Additional product information (Necessary)
To improve your product listing further, you can enter additional information such as a longer description, additional images, stock management, and crucially assigning your products to Attributes like colour, size, medium/material, interest/content. We’ll now walk you through what these different fields are for.
The Description box is where you can enter a much more detailed description of the product. Providing a story behind the process or the ideas/inspiration behind your piece, descriptions about materials used, dimensions and sizes are essential here even though you may have included them elsewhere. There may be health and safety details, washing instructions if required and any other additional information you would like to include.
it’s best to upload more images to this product you can do so by clicking the box with the + inside it on the right-hand side of your screen. You can then follow the same steps as above when you uploaded the original images.
Scrolling down to the inventory section you can enter an SKU (Stock Keeping Unit) this is an easy identifier for you and is also shown on the product page. It’s common practice for this to have no spaces and to use uppercase, lowercase and/or numbers.
The Stock Status section controls if your products are shown as being in stock. As this is a new product you will probably want to keep this as In Stock.
If you would like the system to keep track of your stock you can tick the Enable Product Stock Management box. This will allow you to enter the Quantity you have and specify if you would like to allow Backorders.
If you would like a customer to only be able to buy one of this item in a single order make sure the Allow only one of this product to be bought in a single order box is ticked.
The shipping section will allow you to specify if the product requires shipping and if you would like to override the shipping prices specified within your store settings. If you would like this product to have a different shipping price tick the Override your store’s default shipping cost for this product box. In the Additional Cost box you can enter the extra cost to ship this product, this value will be added onto your store’s shipping prices. You can also minus a cost by adding a minus before the price.
The Linked Products section will allow you to specify products to upsell, these will be shown at the bottom of the product being viewed or cross sell which will show the products within the customer’s shopping cart.
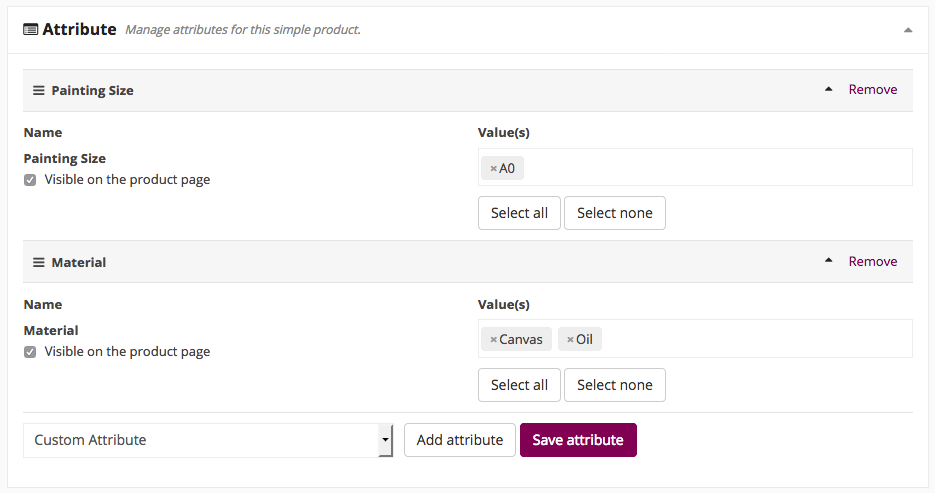
The Attributes section is crucial. It will allow you to specify certain attributes of your product. Such as its size, type, material or colour. If you don’t assign Attributes and Values to your products they will not appear in the filters for customers on the left hand side of the screen. If you would like an attribute specific to your product then you can use the Custom Attribute option. Do note that this will not be shown as a filter to customers but will be on your product page.
You can select from the dropdown one of our predefined attributes. Click on an attribute eg. Colour and then click in the Value box and the values will appear to click on eg. red. Then go onto the next Attribute for example Material/Medium and then choose the values you wish. You do not have to use attributes which are not appropriate. For example colour is only necessary if there is a predominant colour for wearing or decor purposes. Please think like a shopper. If we’re missing an attribute or value that you feel other makers would benefit from, please get in touch.
You can control the Status and Visibility of the product by modifying the options within the Other Options section. You can also enter Purchase Note which will be included in the order confirmation email sent to the customer.
Finally, it’s great to enable reviews on your product you can do so by ticking the Enable Product Reviews box.
You have now uploaded your first product. You can repeat the steps to add your other products. You can also import products from your Etsy Shop.
Next learn how to Process your Orders.
You must be logged in to post a comment.